Why ‘battery vibration test’ is the name of the game

Electric vehicles challenge the durability engineers with new issues caused by the significant weight of the battery. This blog post goes into the nitty-gritty on how to set battery vibration tests to ensure proper durability testing and secure integration into the vehicle.
Very recently, I had to move location. You know how it goes: heavy! I had to put our stuff (carefully) in the boxes and bring it in my car to our new place. After this experience, while driving on some rough surfaces, e.g. Belgian blocks, I wondered why we didn’t rent a truck. Of course, I had to make several rounds from one place to another with my heavy-loaded car. That actually brought me to the question: wasn’t this move harmful to my vehicle?
I need to admit, being a durability engineer, this kind of question bothers me a lot. I love to engage in (not only) durability discussions, especially while doing a physically demanding type of job. This is when I see that many people tend to question many things (even life itself).
I then realized that my car, a plug-in hybrid, has a relatively small luggage compartment for a sedan car. That is due to battery-electric cars having larger batteries, and packaging those is not always very straightforward. But, are those that big that you need to sacrifice the space of your luggage compartment?
Heavy battery, new battery vibration test challenges
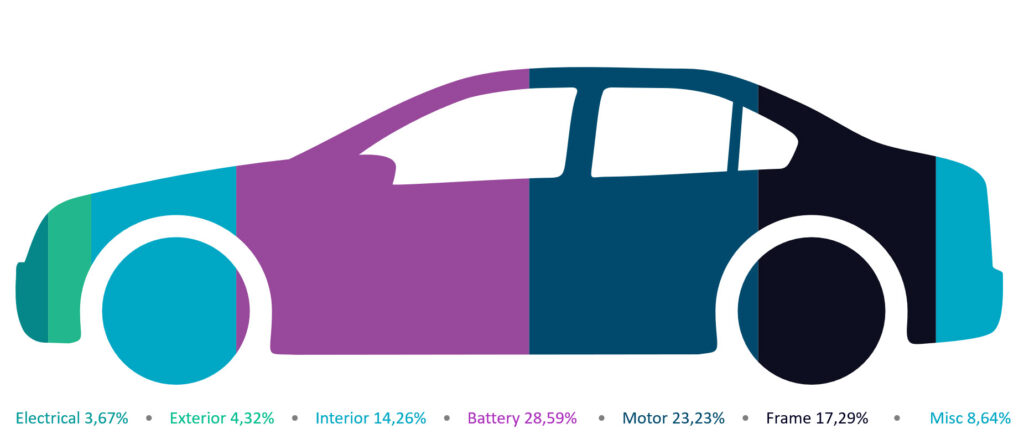
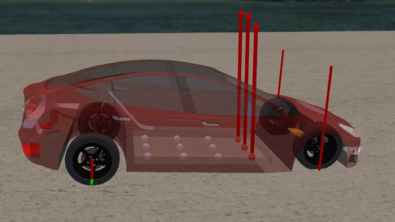
Being puzzled by this question, I researched how big those battery packs might be in an electric car. Believe me, they can be cumbersome! Here is one example I could find which shows the weight distribution of Tesla Model S. The battery mass is 28.59% of the whole vehicle mass – that’s almost 1/3 of the vehicle! That’s a complete game-changer for the vehicle architecture.

Moreover, if you’re like me, also a durability addict, I’m pretty sure that you also have the same questions in mind. Let’s turn this into an even more complicated situation by multiplying the problem.
- How to safely integrate battery packs onto vehicles and ensure the whole car survives for the expected lifetime?
- How to produce reliable batteries before implementing those into vehicles?
Why is the validation battery packs crucial for a vehicle lifespan?
At first glance, you might think that these two questions are almost the same. But they’re not! The first question is related to whole vehicle durability, where we are more interested in battery integration. From this perspective, it is meaningful to take care of the vehicle’s location. For such heavy batteries (remember Tesla Model S weight distribution), battery mounts carry heavy loads and transmit them to the vehicle body. While driving on a rough road in dynamic conditions, you might observe high force levels around the battery area.
To solve this potential problem, you need to have a structured durability engineering process. Preferably, this process should cover the whole vehicle level. Typically, for these situations, we see high amplitudes of forces and displacements, which cause fatigue problems. And we mostly experience these high levels up to certain frequency levels (traditional durability or fatigue characteristic; high amplitudes, low frequency).

The second question is more related to the battery itself. So, as well as the road-induced vibrations, you also need to think of the battery-induced vibrations. Remember, electronics inside the battery packs can also act like vibration exposer. And again, in dynamic conditions, you might face unexpected durability failures due to both high loads transmitted to the battery via battery mounts and vibrations induced by the battery itself. For such situations, you should also think of vibration fatigue. It is where the loads’ high-frequency content might also play a critical role in potential durability failures.
In this blog post, I’ll focus on how we can bring reliable batteries to implement on vehicles and why the battery vibration test is essential in this procedure.
Bring battery vibration test to a spotlight
To better understand the durability issues caused by the battery pack, you need to assess the battery vibration test. The first thing you can do is to validate your battery according to the pre-defined standards. Some of these are available for testing the batteries, such as IEC 62660, ISO 12405, SAE J2380, etc. They will already give you some battery vibration test profiles that you can use on your shaker. These standards define:
- vibration mode (sine or random),
- axis to apply the loads,
- acceleration level,
- test duration…
It seems like you have everything to validate your battery design before implementing it on your car.
To execute the battery vibration test, you will need a shaker with a closed-loop controlling strategy. You want to make sure that both the measured input and the output are on the desired level.

At Siemens, we help our customers with hardware and software solutions to reliably execute closed-loop vibration qualification testing on shakers. And I should also indicate that the solution we offer is sufficiently reliable and even used for satellite testing.
Are we good to implement the batteries which pass these standards? Well, I’m a bit hesitant with the answer since I have another question in mind: Are the standards as severe as my real customer usage?
If not, be ready for some durability and fatigue-based issues you might hear from the customers. It’s also possible that you see zero issues from the field. But that might also be an engineering issue since the design might be over-engineered.
Go beyond standards: Define right vibration qualification tests!
As mentioned, the battery vibration test standards pre-define the test profiles. But don’t forget, you also need to make sure you’re testing with the correct loads.
Testing with the right profile is vital to avoid over-testing or under-testing. Under-testing might lead to late durability issues, which would be very expensive to fix. Over-testing might lead to high material costs and unnecessary engineering efforts. Basically, we can count on three critical criteria when creating vibration test profiles for battery validation:
- Realistic loads utilization – opt for real-life measurements rather than using just the standards
- Correct profile determination – profile should be damage equivalent with real customer usage
- Test acceleration – keep the damage but shorten the test duration
How to optimize the battery vibration test profiles
To create the most optimal test profiles, you can rely on Simcenter SCADAS data acquisition hardware and Simcenter Testlab software solutions. Simcenter SCADAS will help you acquire multi-physics data from real-life conditions to see how your battery is affected by road loads and battery-induced loads. At the same time, Simcenter Testlab will allow you to configure your channels, analyze damage potential on acquired vibration signals and create synthesis test profiles. This approach is called Mission Synthesis. Here is the workflow:

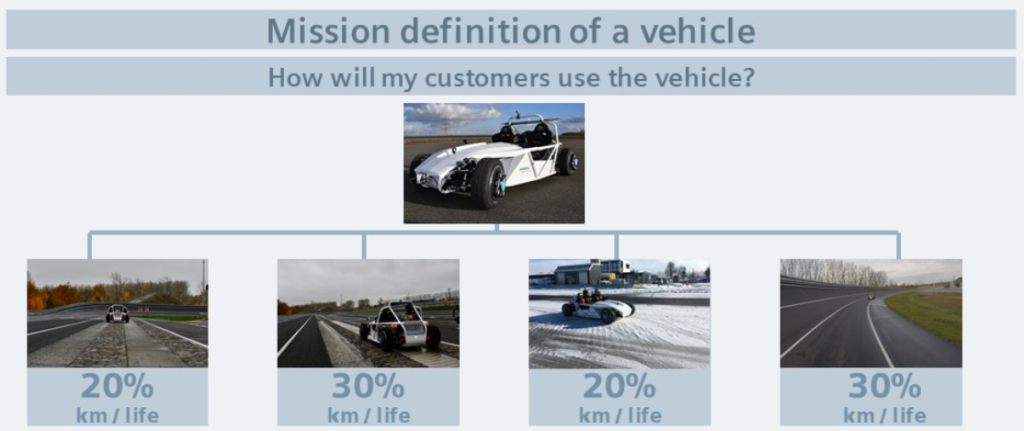
Define how your customer is using your car
Before you proceed further, you need to ask this fundamental question: “What will happen to my product once customers use it?”
To answer this question, we need to identify the operational environments of the vehicle. The example below shows four practical settings (environments) concerning distribution in a total lifetime from a specific market.
Obviously, you need to acquire relevant data from these different environments (missions). Typically, test engineers acquire vibration data from the test component’s mounting locations using a shaker. As the next step, they calculate Power Spectral Density (PSD) from acquired vibration data.
The optimal testing toolset for data acquisition and damage potential analysis
Simcenter SCADAS hardware is designed to enable multi-domain acquisition campaigns acquiring analog and digital data. This can be from a wide range of sensors, including vibration, strain, force, displacement, microphone, video, GPS, temperature, pressure, voltage, and so forth.
I’d like to point out that you can use acquired vibration data already as an input to the shaker table using PSD calculation. This refers to the bullet saying: ‘Realistic loads utilization’. But this is not enough to create a damage-equivalent and accelerated test profile. Now you may think: “How to quantify the impact of severe environments on my product?“
Battery vibration test step by step
To better understand the durability impacts of different environments, we should go more into vibration fatigue, where we calculate the responses based on an excitation. So, we should focus on Fatigue Damage Spectrum (FDS), Maximum Response Spectrum (MRS), and Shock Response Spectrum (SRS). These calculations are for assessing the fatigue damage potential linked to high cycle fatigue. Assuming that the resonant frequencies from vibrations signal are considered as SDOF (Single Degree of Freedom) systems, we take frequency and Q-factor damping into account. The responses (relative displacements) are calculated from each of these SDOF systems.
After understanding the damage potential, the next step would be for test acceleration to create random PSD or sine sweep profiles (or even combined) from calculated response spectrums (FDS, MRS and SRS). Simcenter Testlab enables an automated environment where the test duration is user-definable while the software already considers the damage potential.
As a final step in the process, we mount the battery on a shaker. We fix it in the same direction as it will undergo the primary vibrations in real-life. We load the synthesized test as calculated in the Simcenter Testlab Mission Synthesis software and start the vibration control test using the Simcenter Testlab vibration control modules in conjunction with Simcenter SCADAS hardware.
Why is mission synthesis a game-changer for the industry?
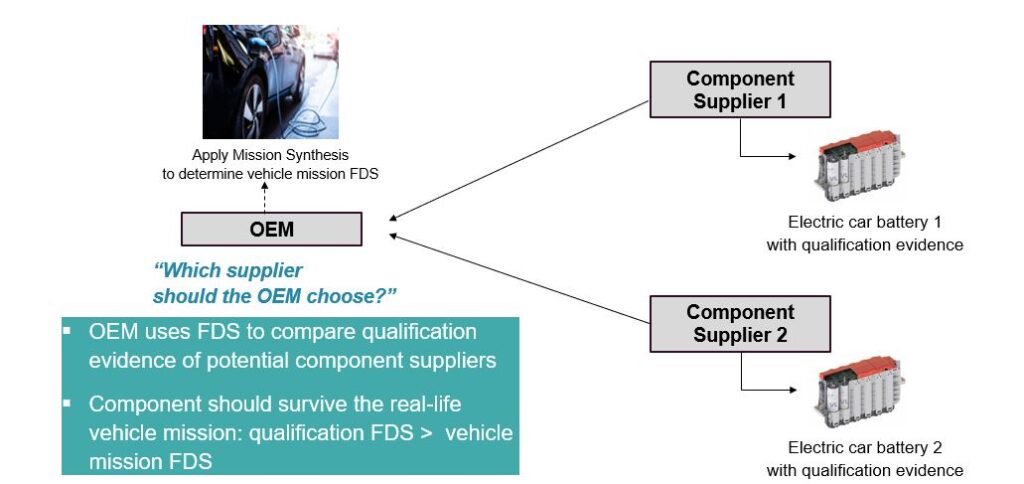
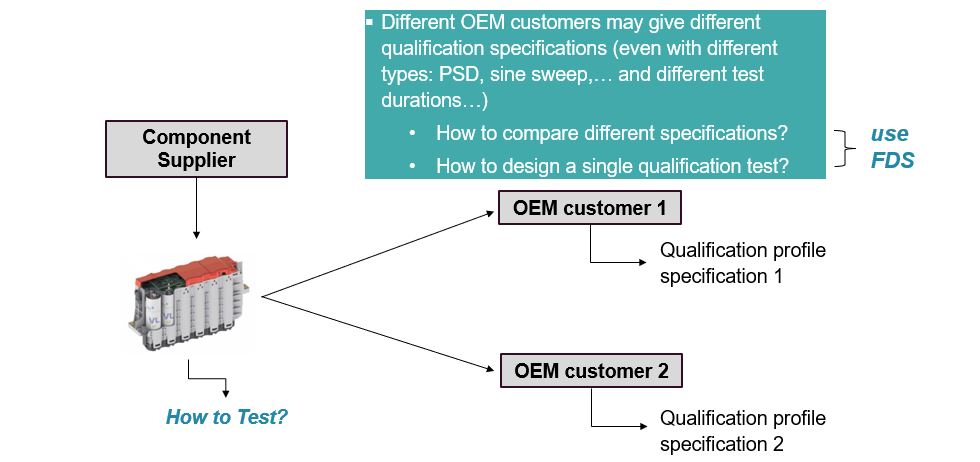
Mission synthesis brings meaningful insights both for the automotive manufacturers and for the suppliers. With this technology, the car companies can use Fatigue Damage Spectrum (FDS) to compare potential battery suppliers’ qualification evidence. And from the supplier’s perspective, this technology allows suppliers to create a single qualification test to compare different qualifications.
A real example: Comparing standards with road synthesized profiles
Very recently, I had a chance to compare some of the well-known battery vibration testing standards for passenger cars with some road load data I acquired from different road surfaces. I should also indicate that those standards are mostly designed to consider the expected durability lifetime of components. So, I needed to cover the whole lifetime with my measured data as well in order to have a back-to-back comparison. Simcenter Testlab software gives a very unique opportunity to compare different scenarios based on durability potential. In my case, I used Simcenter Testlab to compare standards with road synthesized profiles.
The results were actually very interesting when I compared these different profiles based on FDS and MRS results. For some frequency bands, standards give higher responses which result in higher damage potential. And for some other bands, road synthesized profiles give more. So, it requires some job to identify the best profile for your battery validation.
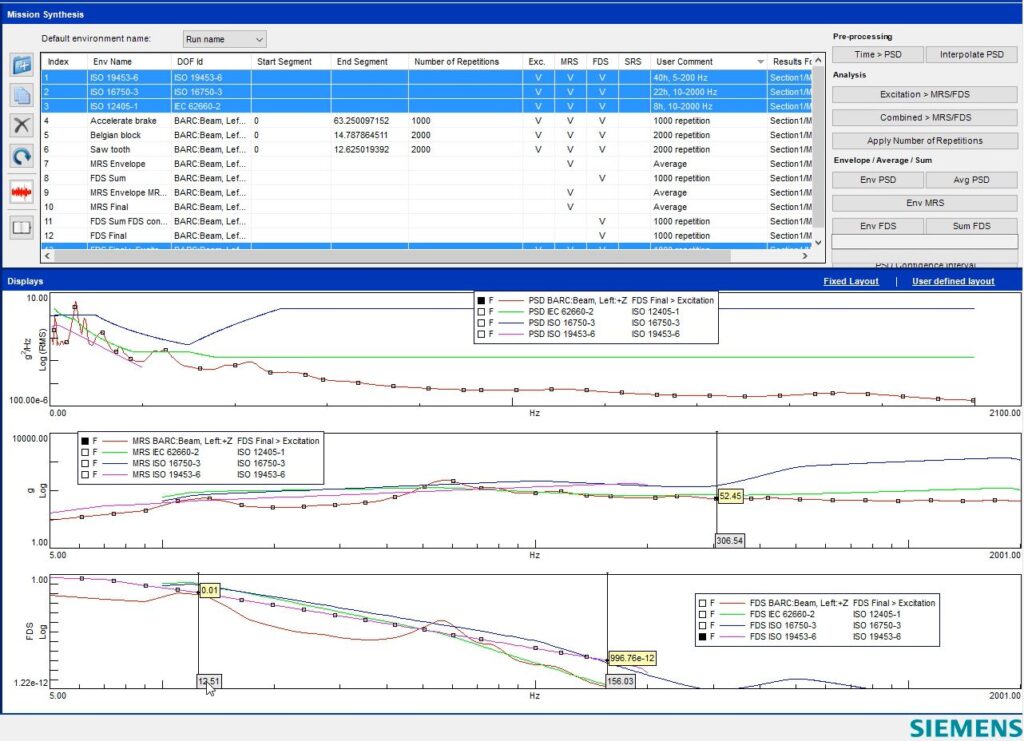
It will also be vital to indicate that Simcenter Testlab even gives you the opportunity to create some more iterations on these different profiles. If you want to consider the worst-case scenario, you can still envelope FDS and MRS profiles coming from standards and road synthesized profiles. This would give the opportunity to consider all the peak responses throughout the whole frequency band. But, please keep in mind that such actions might lead to over-testing as well…
The final words to conclude on battery vibration test
As mentioned, standards allow you to test your batteries with some pre-defined test profiles. You need to remember using the correspondent loads. An efficient battery vibration test is vital to:
- meet expectation for high quality, reliability, and short test duration
- reflect different environmental vibrations (such as transportation, road impact, battery induced vibrations, etc.) during a lifetime
- find the optimal testing balance (under-testing increases the chance of mechanical failure and adds cost; over-testing leads to unnecessary engineering cost)
Are you looking for more detailed information? You can watch the webinar which I presented very recently. Or you can always comment below.
Some useful links:
Validate your electric battery with realistic vibration testing webinar
What is Vibration Control Testing?
Comments
Comments are closed.


Great blog. Thanks for penning!
Can HEEDS be used to design space exploring on batter vibration test to arrive at optimal design?
Thanks,
Karthik