First Steps to Automation – Part 2
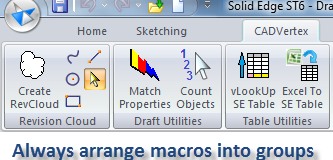
Keep typing more lines as shown below:
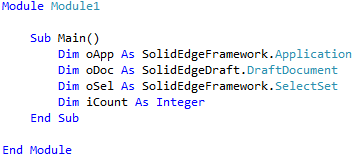
As evident, oDoc stores the Draft Document whose type definition comes from the DraftDocument type library referenced earlier.
Similarly, oSel is a variable that stores the object of type SelectSet. Though we are using the selection set in the draft document alone, selection set exist in other environment like Part and Assembly too. Hence it comes from the SolidEdgeFramework type library which hosts definitions for objects common to various Solid Edge environments.
The SolidEdgeFramework. prefixed to the SelectSet means the later is fully defined and leaves no ambiguity to VB.Net. The prefix is also called a qualifier. Note: As you type, some lists and tooltips will appear automatically. This is the Intellisense feature of Visual Studio. Ignore them for the time being and continue typing. Your code should now appear as below:
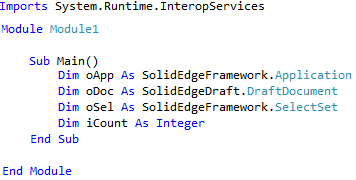
Notice there are no scary formulas or number crunching so far.
Solid Edge automation using programming is fun !! ![]()
Note: Solid Edge automation using Excel is fun too – refer this article and this one.
Now it’s time to access objects and store their values in the variables.
Add more lines after the line Dim iCount As Integer and before the End Sub line:

• oApp stores the Solid Edge object.
• Marshal comes from the namespace added at the very top of the code window that begins with Imports…
• Marshal has a method called GetActiveObject which uses the ProgID or Program ID of Solid Edge which is “SolidEdge.Application” and stored in the registry.
At your own risk, you can search for SolidEdge.Application in the Windows registry. To open the Windows Registry, press Win+R and type regedit. Associated with the Prog ID is the full path and name of the Solid Edge program i.e. Edge.exe found in the LocalServer32 node just above the Prog ID in the registry.
Similar to GetActiveObject is CreateObject which also takes the ProgID SolidEdge.Application and launches or starts Solid Edge through VB.Net. You can use CreateObject in a macro meant to be used from a desktop shortcut and not from a button inside Solid Edge.
When using CreateObject, additionally the Visible property of Solid Edge needs to be set to True as below:

Notes:
• CreateObject does not require Marshal or the Imports statement at the top of the program.
• Don’t use CreateObject in the SelCount macro.
Solid Edge must be running to use the SelCount macro. To check this,
• Start the Windows Task Manager by right clicking the task bar and selecting this option.
• Take the processes tab and Edge.exe should be listed with a description Solid Edge.
Back to the code,
• On the next line, oDoc stores the ActiveDocument property of oApp which is none other than Solid Edge itself.
• oApp knows which is the currently active document and assigns it to oDoc.
Chances are no document is open in Solid Edge so the ActiveDocument property would be blank and the program might run into an error condition.
This will not happen if you run this macro from a button on the ribbon bar in the draft environment, so a draft document will always be available.
• oSel stores the SelectSet which is the set of selected objects in the active draft document via oDoc.SelectSet
• Finally, iCount stores the number or count of selected objects.
Your code should now appear like this: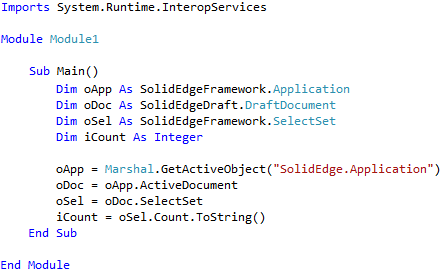
The last step is to actually display the count in the Status bar or PromptBar of Solid Edge.
For this, manipulate the StatusBar property of oApp i.e. Solid Edge as below:
oApp.StatusBar = iCount.ToString() + ” object(s) selected.”
The + sign adds up two strings:
1. The number iCount converted to string by suffixing to it the ToString() function, and
2. The string “object(s) selected.”.
The completed program should appear as below:

This displays a nice message in the status bar, for e.g.

Its time to convert the code into an executable macro. This process is called Build.
In Visual Studio 2010 Express if you don’t see the Build Menu.
1. Click on Tools menu.
2. Click on Settings.
3. Click on Expert Settings.
4. Click on Tools Menu, Select Options. In the dialog box, check the Show All Settings option in the bottom left.
5. In the above dialog, now choose Projects and Solutions. Expand General. Check the option Show advanced build configurations. Click Okay.
From the menus, select Build > Build Solution.
Read the status bar in Visual Studio which should read ‘Build started…’ then ‘Build succeeded’.
Go back again to Window Explorer and check the Debug folder. You should now see SelCount.exe
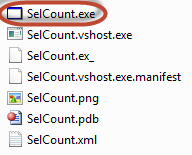 This is our macro, ready for use in Solid Edge. The exe file does not have an icon. You can use the SelCount.png file attached with this blog post and copy it to the debug folder as shown in the image besides.
alternatively you can use MS Paint to create a 32×32 PNG, BMP or ICO file and name it same as that of the macro i.e. SelCount.
To assign the macro to a button on the ribbon bar in the Draft environment, follow these steps:
1. Right-click on an existing button on the ribbon to display the context menu.
2. Select Customize the Ribbon from the menu.
3. In the Customize dialog, the Ribbon tab should be active.
4. On the TreeView on the right side, expand the Home or Sketching nodes – both have the Select group.
5. Expand the Select node and also select it.
6. At the top on the left side, pull down the list called Choose commands from:
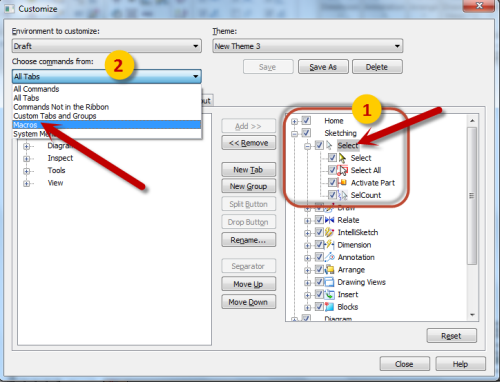
7. At the bottom side of the dialog, click Browse…
8. Pick the SelCount.exe
9. Pick the Selcount.exe again in the left-side list in the Customize dialog.
10. Click Add >>

11. If you have also copied the SelCount.PNG to the same folder as the EXE, the icon will be picked up automatically and displayed.
Note: If you want your own icon, make a 32 x 32 PNG file using MS Paint. ICO and BMP files should also work.
12. Right-click the SelCount.exe and select Rename or simply press F2 to rename it.
13. Select the SelCount node in the tree and click Move Down several times to move it to the end of the list which also moves it appropriately in the ribbon group.
14. Right-click on the SelCount node in the tree and select Small/Large button and Text/No text as desired.
15. To assign a keyboard shortcut, take the Keyboard tab and follow the steps in the image below.
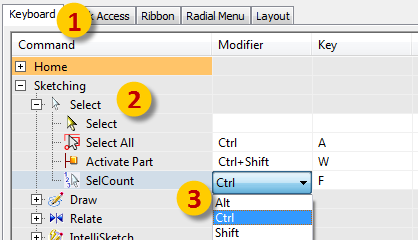
16. Close the Customize dialog. Hover the mouse cursor over the SelCount macro in the Sketching tab on the ribbon.
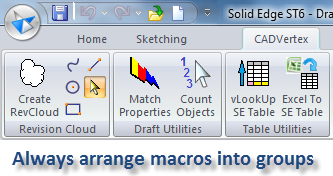
17. Check everything appears fine and the macro works properly.
Even with no object selected, the PromptBar should display
‘0 object(s) selected’.
See the attachments with this post below for the SelCount.PNG file.


Comments