KeyShot Live Linking in ST6

Most of us are in the business of making things and all of us want our products to reflect the hard work we’ve put into them. With ST6 and the new KeyShot plugin you can now make beautiful renderings and it doesn’t take any hard work at all.
For those of you who might not be familiar with KeyShot, here’s the rundown:
– Created by Luxion which was founded in 2003
– Uses a physically correct and CIE verified rendering engine featuring many innovations developed by Academy Award Winner Dr. Henrik Wann Jensen[1]
– Uses real-time ray tracing technology
– Has a wide array of animation options
– Comes with a vast material library
– Is entirely CPU based
– Uses HDRI’s for lighting
Rendering comes as an afterthought to many designers. When I’m designing something I’m usually more worried about the guy actually making my model than how pretty the picture is. One of the other reasons rendering always ranked low on my to do list is because it can be very difficult, it takes a lot of time to set up lighting and materials and get everything looking just right; KeyShot has changed all of that and Solid Edge ST6 has taken it a step even further. Companies like Fossil, Black & Decker, Skull Candy and Blizzard Entertainment (makers of StarCraft, World of WarCraft, etc.) all use KeyShot because it’s so easy. Ease of use has also made KeyShot very popular in the GrabCAD community. In the past Rendering was always last on the list of things to do because once you get through setting up your model to be rendered, you don’t want to have to go back and create a new rendering due to design changes. With the new Live linking plugin for ST6 users can now setup their model in KeyShot and push any changes made afterwards in Solid Edge to their KeyShot model, while retaining everything they had already setup.
With Live linking users are able to:[2]
- Maintain color assignments at the part and assembly level
- Maintain assembly structure
- Transfer saved camera views
- Update models inside KeyShot
- Export to bip without KeyShot installed
To start using the new Live linking plugin, users can go to http://keyshot.com/downloads/plugins/#tab-solid-edge and download the small exe.

After clicking Install on the dialog you’ll see a new group on the Add Ins ribbon in Solid Edge.

Now that the plugin is installed and ready to go, open up a model or create a new one and click the ‘Render’ button. KeyShot will automatically open and you’ll go from this:

To this in about 15 seconds:

Add 3 or 4 minutes and you’ll end up with this:

KeyShot even makes it easy to animate your model, check out this short video of my Corvette model’s headlights popping up:
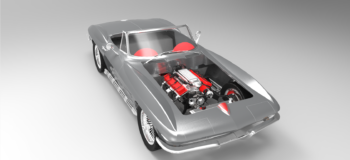
All of the above was very quick and very easy but that doesn’t mean I want to do it all over again if I make a design change to my model. Let’s say that I want to drop an engine into my Corvette model and I also want to see what it looks like rendered. One of the great things about live linking is as long as I have my Solid Edge and KeyShot models open in their respective programs I can update the KeyShot model no matter how much time has passed since the last time I opened it.
After I open up my KeyShot model and get the engine put into the model in Solid Edge I go back to the KeyShot group on the Add Ins tab and instead of clicking ‘Render’, this time I click ‘Update’. Once back in KeyShot I’m presented with this window:

It can take a little while to update your model depending on how large it is, this one took about 30 seconds, but once you see the status bar completed and the dialog disappear your model will now have the same geometry as your Solid Edge model and will have retained all of the materials you previously added in KeyShot. So now, like my Solid Edge Corvette, my KeyShot model has a heart and I didn’t have to reassign any materials.[3]

There are some limitations however. If you delete a part from your model in Solid Edge and click ‘Update’ you’ll notice that the part you deleted is still in your KeyShot model. To fix this you’ll have to go into the Scene Tree, find the part you deleted in Solid Edge and delete it in KeyShot.
Early adopters of the live link plugin may also notice that on Update some faces on large models update to strange colors. This is caused when in the process of dragging and dropping a material onto your KeyShot model, you may pause for a second over another part and KeyShot shows you a preview of the material on that part. Now when you click ‘Update’ it updates to the previewed material instead of the assigned one. Rest assured Luxion has a fix and it should be introduced in a KeyShot patch in the near future. Until then, you can simply reassign the intended material back to the part.
One important protip I’d like to pass on is if you have a part that is all one color in Solid Edge than you’re limited in KeyShot to applying just one color to that entire part, in other words you can’t make specific faces or features of that part different colors. One of the best thing about the Live linking plugin is you get the selection and editing power of Solid Edge in KeyShot. If you need a face or feature to be a different material than the rest of your part, go back to Solid Edge, and assign a different style, it doesn’t matter which one, to your part using the face or feature option. Now when you click update you’ll have a new style that you can drag and drop a KeyShot material onto.
With the new ST6 KeyShot plugin you’ll be able to render and add design changes to your model easier than ever before. The new plugin doesn’t just increase productivity it actually makes creating models and rendering them fun. If you’re like me, even though you can create a fantastic production quality rendering in a few short minutes, you’ll end up spending hours playing around in KeyShot and seeing all of the amazing things that it can do.
If you would like to see some more KeyShot Renderings as well as some KeyShot VR’s, please visit my site here.


Comments