Large Assembly Techniques for Performance

 “Large assemblies” is a term that means different things to different people. If the number or complexity of parts in your assembly poses a performance problem to your computer/hardware/network, then you have a large assembly, regardless of the number of parts. For some people that limit is going to be anything over 1000 parts, for some maybe 10,000 parts, and for others 100,000 parts. It’s good to know that Solid Edge can handle assemblies as large as you need to create. The following article is based in part on conversations with Art Patrick, the Solid Edge assembly development planner, and in part on my own experience of 20 years of CAD work.
There is no single magic bullet when dealing with large assemblies or assemblies with performance problems. There is no single solution to all or even most performance problems. Getting the most out of Solid Edge to work efficiently with assemblies of any size takes planning and some up-front work. Let’s list some of what you can do to improve your large assembly performance:
 Simplified Parts.
One of the biggest impacts you can have on assembly performance is to simplify parts that are reused many times. For example, if you are using a lot of hardware, you certainly need that hardware to show up in the BOM and the drawing, but how much detail do you need? Do you really need to show detailed helical threads? Markings on the head? That little fillet under the head? Could you maybe get away with just the head shape and the body of the screw extruded to correct depth? Could you maybe even get away with just the head?
You probably don’t do detailed stress analysis on bolts unless you are the bolt manufacturer, so very few companies really need that level of detail. If you do interference checks and mass calcs at the subassembly level, you need to have a fairly accurate representation of your hardware, but you might be able to get away with a very simplified representation of your hardware at the upper level.
Remember that the computer has to draw every edge that you create, and if you have hundreds or thousands of screws, a single extra edge on the screw means your computer has to redraw those extra thousands of edges.
 The same sort of idea goes for electronics components on circuit boards, purchased motors or pumps with a lot of detail.
Just try to think ahead, and determine what level of detail you need at a given level in your assembly structure. And understand that some types of detail are very expensive computationally.
Large patterns of features or individual parts can cause assembly performance problems. Do you really need to see that at the top level? Extruded text. Company logos. Large number of textures displayed on-screen. Be careful in particular with parts downloaded from vendors, as they might have several types of surprises such as surface bodies, internal features, or very small edges.
In a later article, we will talk more about actually creating simplied versions, in this article I just wanted to call attention to their use to help manage assembly performance.

Display Configurations
Configurations are sets of parts turned on or off in the assembly. You can use these to help you navigate around the assembly. If you can use subassemblies instead, that is probably a better method, but Configurations enable you to work at the top level with less visual clutter, which of course translates into less work for the video card.
Display configurations work by you turning off a set of parts and saving that state as a named configuration. From there you can continue hiding or showing parts, but it doesn’t change the configuration unless you save it. This enables you to go back and reset your display with the same configuration state after you have made several changes.
Beware of Massive Multibodies
Some people reason that saving a large assembly as a single part will make it perform faster. The software doesn’t have to worry about finding those files all over the network, right? Sort of. But part of the reason we work with assemblies and not multibody parts is that assemblies have special abilities to reuse information. If you have one part with 100 occurrences, the assembly understands this, but a part doesn’t. The part has to work with each body occurrence as a different entity. So it turns out that this is not a great solution for assembly performance. There might be other reasons for doing it, but assembly performance is not one of them.
Costly Assembly Operations
 Some things you do in the assembly take up more computational resources than others. Assembly features, for example, require the assembly to make sure the parts are updated, bring the parts into the assembly, position all the parts, and then add a feature to the positioned parts, with potential differences between part occurrences. That can really add up.
Inter-part relations are also very costly for the same reasons. This is one of the reasons why Synchronous Parts and Assemblies are recommended for better performing assemblies. You can create relationships between parts in an assembly only when needed, without the associative links.
You might consider freezing links when you are done working with that area of an assembly.
Errors
If you have broken links in your assembly, the software is going to spend a lot of time looking for those files. This even goes for things like lost texture files. Even broken links in mates and conflicting mates will cause the software to work hard trying to fix the problems. You should try to resolve these errors as you work instead of allowing them to accumulate. If/when you go back to try to fix the assembly, it is much easier to solve a series of individual small problems rather than try to detangle a set of issues on top of one another.
Display Settings
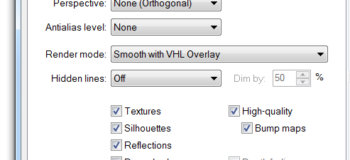
 Cool visual effects are cool. But everything that’s cool has some sort of price tag associated with it. So make use of the cool visual stuff in your parts and lower assemblies, but when you get to the upper level assemblies where system performance becomes an issue, you’ll have to consider the trade-off between cool and fast.
- turn off Reflections
- turn off Drop Shadows
- turn off Cast Shadows
- turn off Silhouettes
- use Shaded (w/o edges) or Single Edge Color (if you use visible edges)
- Use Culling (with slider as far to the right as you can stand)
- Sharpness set low
- Turn off View Transitions
- Turn off Glow

Summary
As you get deeper down into the large assembly rabbit hole, you’ll find that good performance comes with good planning. Some of these techniques will not have much value until you get above a certain number of parts. If you will run into large assemblies at your place of work, you need to be prepared with all of these techniques before you need them.
PS: Thanks to everybody’s buddy @Imics for suggesting this topic to me about a year ago. I may be slow, but I didn’t forget about it.


Comments