Strike it Rich with the PathFinder

Everyone wants to find a hidden treasure. Just imagine walking around in the woods and stumbling across a treasure chest of pure gold guinea coins. Pirates hid them all the time, sunken ships hold endless amounts of wealth under the sea, and some people are giving away their life savings just for the fun of it. Treasures are hidden all around us, and all we have to do is search for them.
When working in Solid Edge be it the Assembly, Part or Sheetmetal environment, Synchronous mode or ordered, in the sketcher or the ERA environment, remember to travel west to strike it rich. There the PathFinder is waiting for you to be explored and fathomed, to dig out all the goodies that it has silently
gathered while you were busy modeling your dream product.
1.
If you are still a ordered-only loyalist, knowing the Parent-Child relationship between features comes in handy when your design intent shows signs of going south and you see a pressing need to interrogate. The relation can be shown right away by right-clicking on the complaining feature.

2.
The next one is my favorite as a design automation specialist. Selecting Add Suppression Variable for a feature from the context menu in PathFinder automatically creates a special variable named <Feature>_Suppress.
When the value is set to 1 it implies Yes: Suppress the feature and 0 means No: do not suppress i.e. unsuppress.
Using this technique I can create various configurations of a part by simply linking these variables to a Excel sheet or from a custom program written in VB.Net
Just 3 suppression variables each for a keyway, a hole and a taper feature enables me to generate the following variants of a shaft:
- Simple Shaft: all suppression variables set to 1
- Shaft with hole: suppression variable for just the hole feature set to 1
- Shaft with a keyway
- Shaft with keyway and hole
- Tapered shaft
- Tapered shaft with hole
- Tapered shaft with keyway and hole

3.
The most important context menu facility in the PathFinder is to move ordered features to Synchronous. The advantages of doing so are discussed all over this blog. One of my favorite is reordering rounds as illustrated below:

4.
Picking features and grouping them is another popularly used technique. This facilitates suppressing or un-suppressing a bunch of features in one go for example or for dynamically editing them together.
Features can be grouped together and a group can have other groups as members.

5.
In the ordered mode, the PathFinder can be right-clicked to specify what to display in the PathFinder itself:

This helps get rid of clutter like construction elements, sketches, etc. and render the PathFinder itself neat and clean.

6.
In the Synchronous environment, the PathFinder collects used sketches in a separate collector since Synchronous features do not depend on sketches after creation.The context menu can be used to restore such used sketches for building new features.

7.
Apart from this, Lock Sketch Plane can be accessed from the PathFinder though not exclusively since the F3 key can be used as well.
8.
The Migrate Geometry and Dimension is another important switch available from the PathFinder for sketches. This allows for dimensions of the sketch to be directly applied to the faces/edges of the feature it creates. This automagically make your Synchronous models fully parametric without having to rely on the underlying sketches.
9.
A unique and amazing facility in the Synchronous PathFinder is sorting features by type. This makes it easier to find a particular cutout or round you constructed. Because a Synchronous model has no strict history tree order that must be maintained, it makes no difference in what order the entries in a collection are listed. So grouping eased by sorting together is a novel way to manage a model.
10.
The PathFinder comes in best in the Assembly environment where components can again be grouped for easy finding and to render the PathFinder display spick and span.

11.
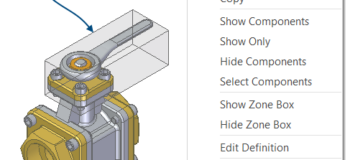
Similar to groups but more versatile is the Zone feature which often gets overlooked because it needs to be accessed from the Select Tools flyout in the EdgeBar.

Once again the PathFinder comes to rescue by providing this facility from its context menu. Simply pick all components – parts or subassemblies – to create a zone out of and the command can be accessed from the More… cascading menu of the PathFinder.
12.
The best one comes in last and unarguably is ‘Zoom To’. When accessed from the PathFinder it zoom fits to the component preselected in the Pathfinder. What a great time saver!
Conclusion
Now that it is amply evident that a rich set of commands and facilities await you in the PathFinder, the time to explore this treasure trove of productivity boosters is now!
Edgers Ahoy! Sailing on the high seas, If you too strike it rich day in and out, be generous and share your favorite PathFinder hip tips in comments below.


Comments